How to Put a Line Through Text in Word

Though it's rare, there are times when we need to show that text should be removed from a document without actually removing it. The best way to do this is to learn how to strikethrough text in Word or your respective editing or social media application. Today we're going walk you through just that, but first a word about what strikethrough is.
What is strikethrough?
Strikethrough text, also known as crossed-out text, lets you put a line through words. In Word, strikethrough takes the form of a character format, which allows you to easily add and remove it at will.
In other applications, you may have to use an online tool to generate your strikethrough text. Or, if the application supports markdown, you may also be able to use the double tilde symbol (~~) before and after your text to achieve the effect.
Today we'll be showing you how to put a line through text in Word using several methods, but also share an online tool you can use for any application. Let's start:
How to Strikethrough in Word with Font Formatting
The most user-friendly way to strikethrough text in Word is via the ever-familiar font formatting panel. Here's how you access it:
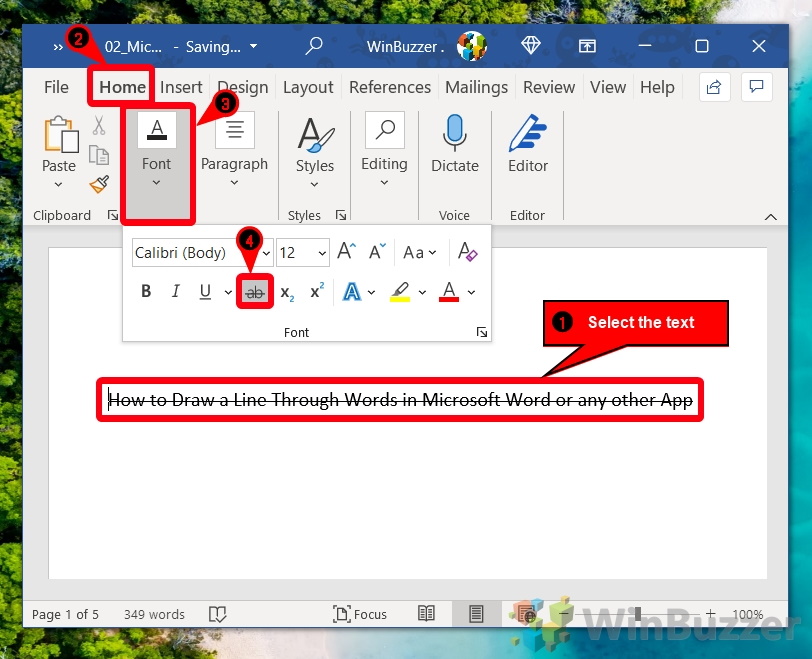
- Select your text, open the Font dialog, and press the strikethrough symbol
You can find the font panel in the "Home" tab of your ribbon. It's where you have bold, underline, and other formatting options. The button will look something like this:
abIf you want to do this faster, you can also press Alt > H > 4 on your keyboard.
How to Put a Line Through Text in Word Using the Font Dialog Box
If you need an alternate method to above, you can strikethrough text in Word quite quickly by using the Font dialog box and some handy keyboard shortcuts. Here's how:
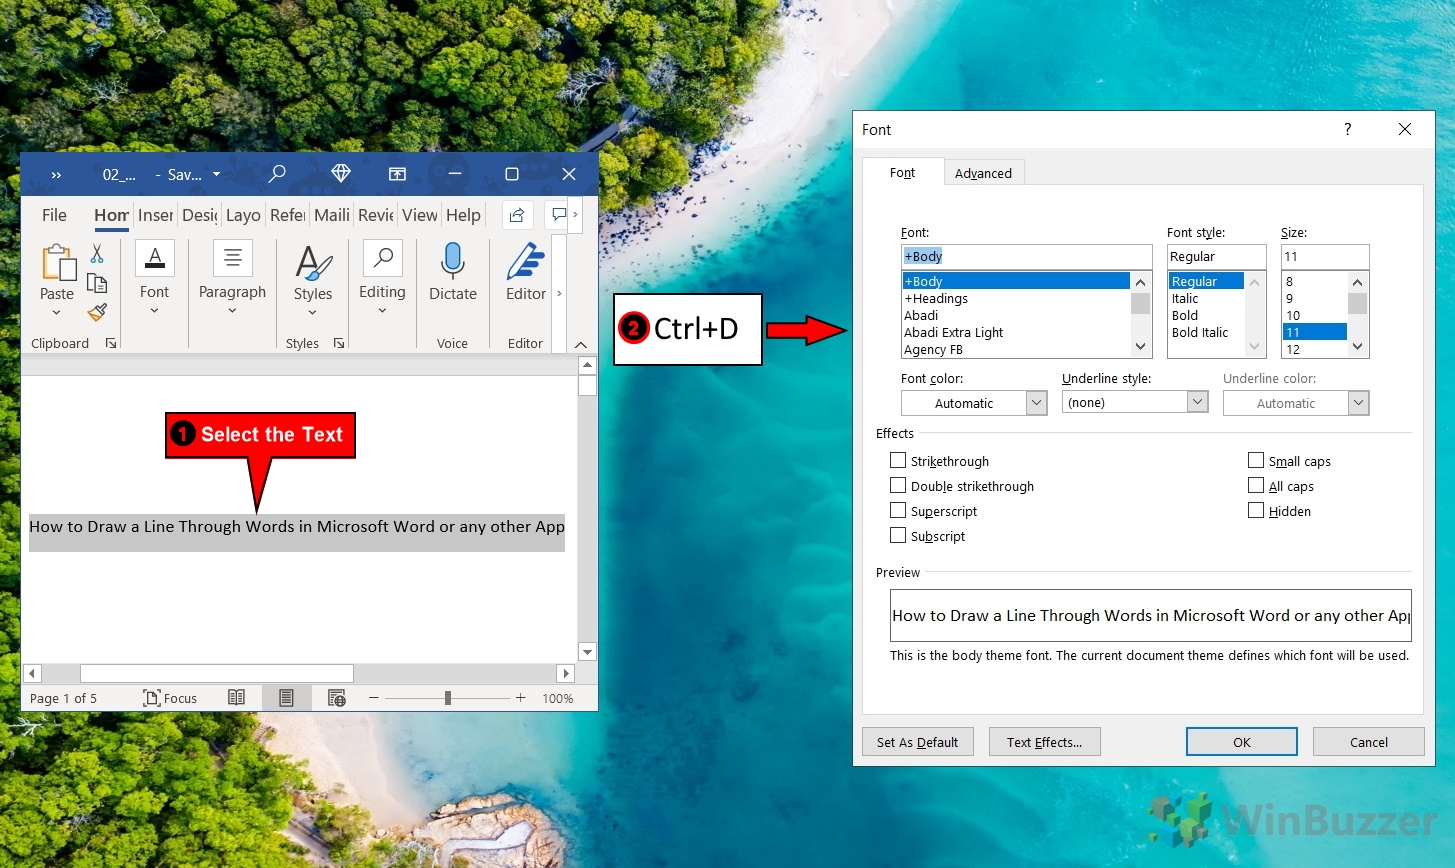
- Select your text and press Ctrl + D
You should see the font dialog box pop up with all of its normal options.
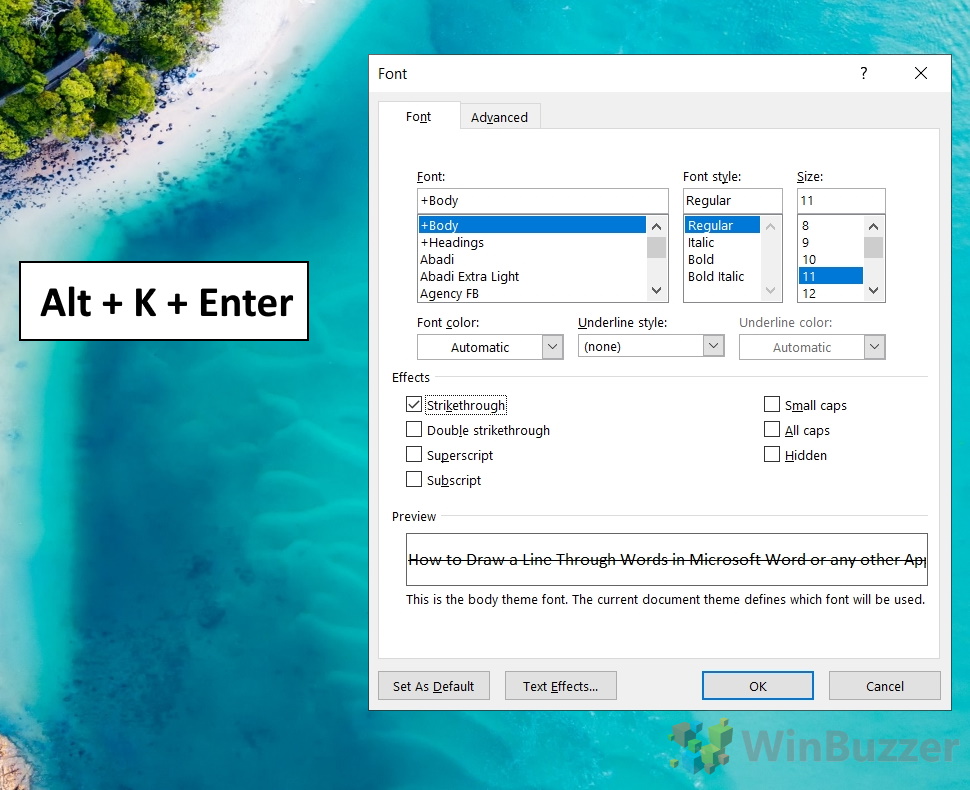
- Press Alt + K, then Enter
Alt + K will tick the strikethrough box without you needing to take your fingers of the keyboard. The Enter key applies the changes.
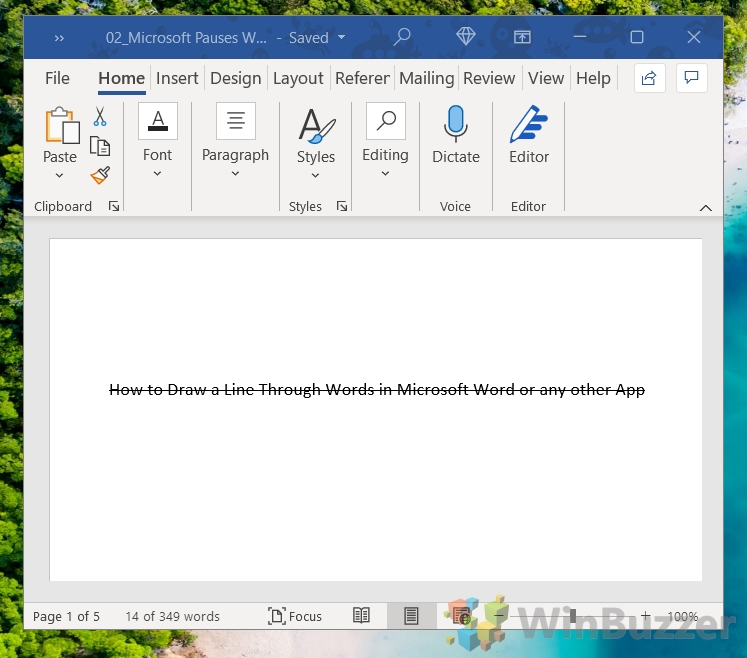
- Check your crossed out text in Word
You should see that the text you selected has a line through it, just as intended. With a bit of practice, you should be able to complete this whole process in less than a second.
How to Add Strikethrough in Word to the Quick Access Toolbar
For faster access to strikethrough in Word, you can add it to your quick access toolbar, which will both make it more visible and easier to access via keyboard shortcut. Here's how you can do so:
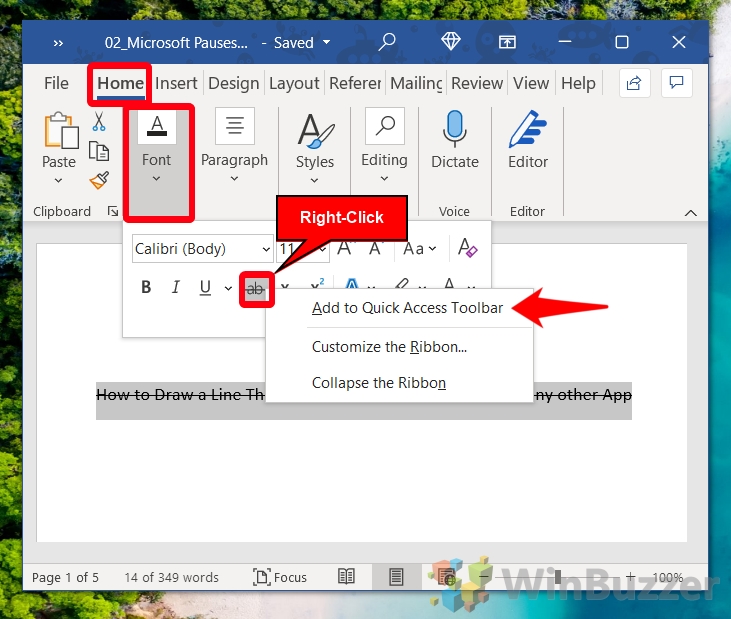
- Right-click the strikethrough button in the "Home" tab and select "Add to Quick Access Toolbar"
Depending on the size of your Word window, you may have to click the "Font" button to expand the font panel.
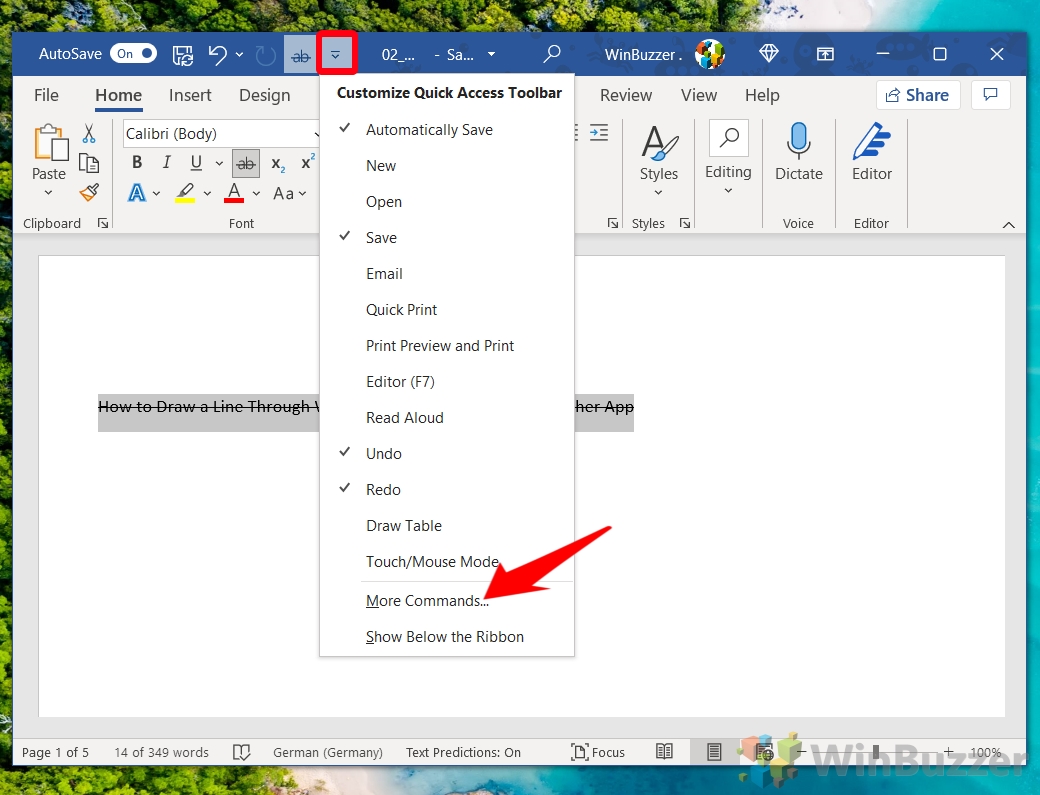
- Press the Quick Access dropdown arrow and press "More Commands…"
Depending on your Word settings, the quick settings dropdown will either be just above or just below your ribbon.
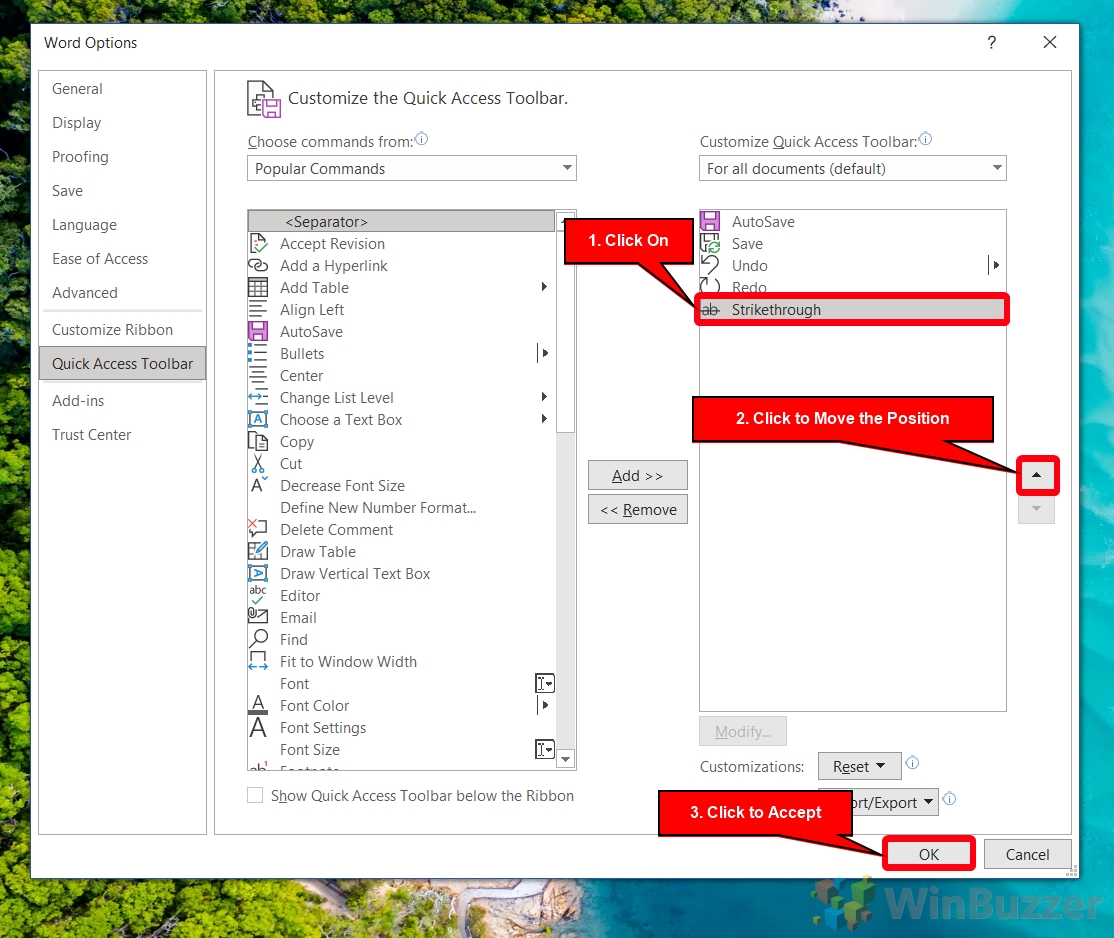
- Select Strikethrough from the right-hand list and change its position
You can press the up and down arrows on the right-hand side to move it to wherever make the most sense to you. Bear in mind that the position in the list will determine the number you have to press to apply it with a shortcut. If it was first in the list, for example, the button would be Alt + 1. Click "OK" to save the changes.
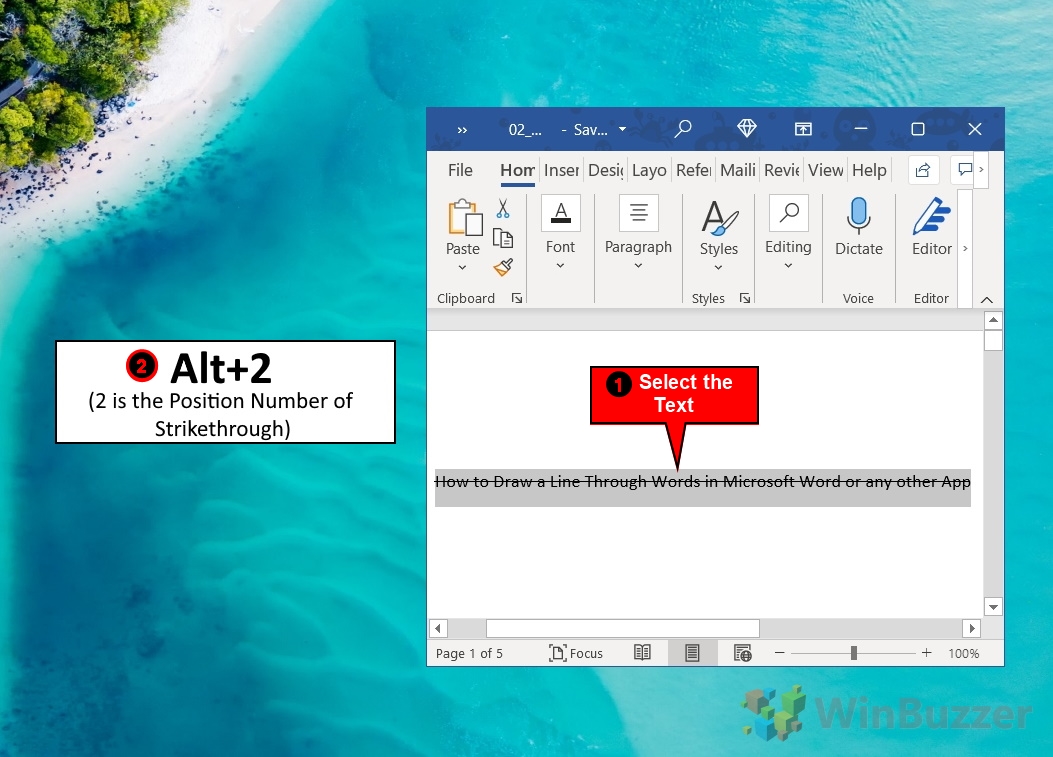
- Select your text and press the relevant keyboard shortcut
If your strikethrough is second in Quick Access list like ours, this will beAlt + 2. Otherwise, it could be Alt + 1, Alt + 3, Alt + 4, etc.
How to Create a Word Strikethrough Shortcut
The default Word Strikethrough shortcut is a bit of a pain, requiring you to press Alt, then H, then 4. We can change this by creating a custom strikethrough shortcut:
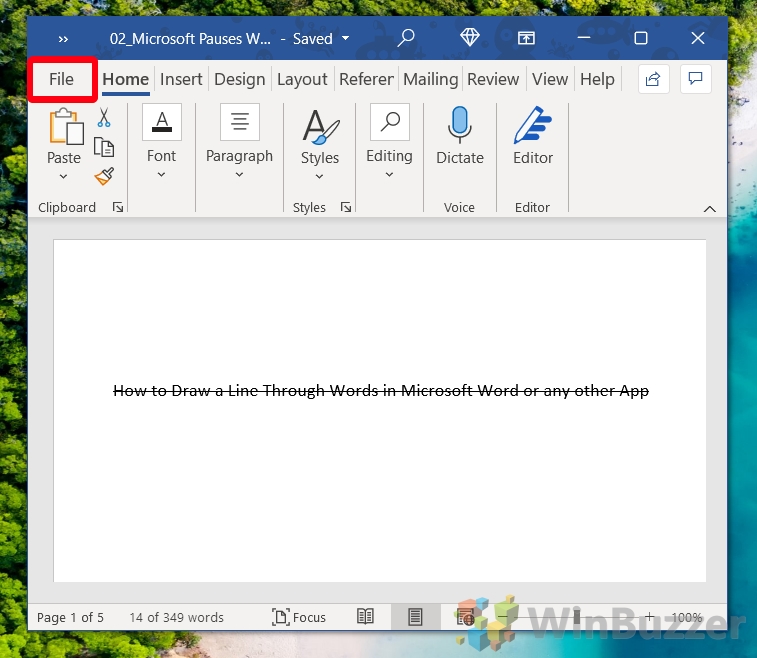
- Click "File"
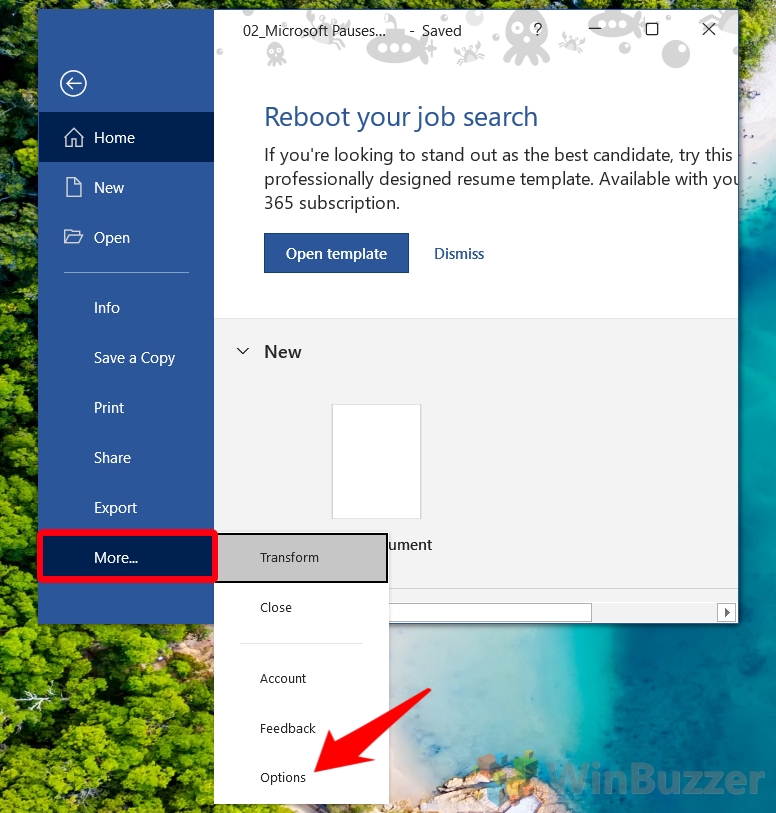
- Select "More… > Options" from the sidebar
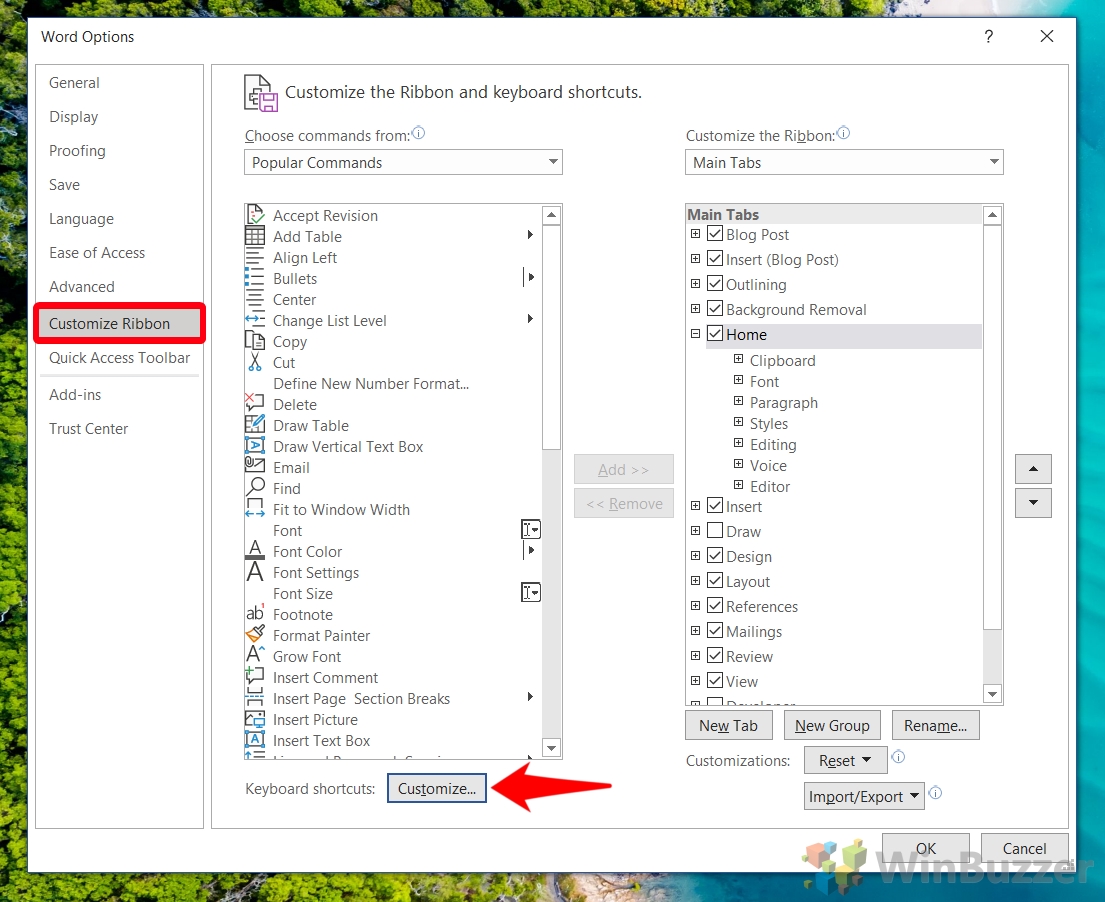
- Select "Customize Ribbon" and press "Customize" next to "Keyboard shortcuts:"
This button should be located underneath the left-hand list.
- Click "Home tab" in the left column and "Strikethrough" in the right
Step description
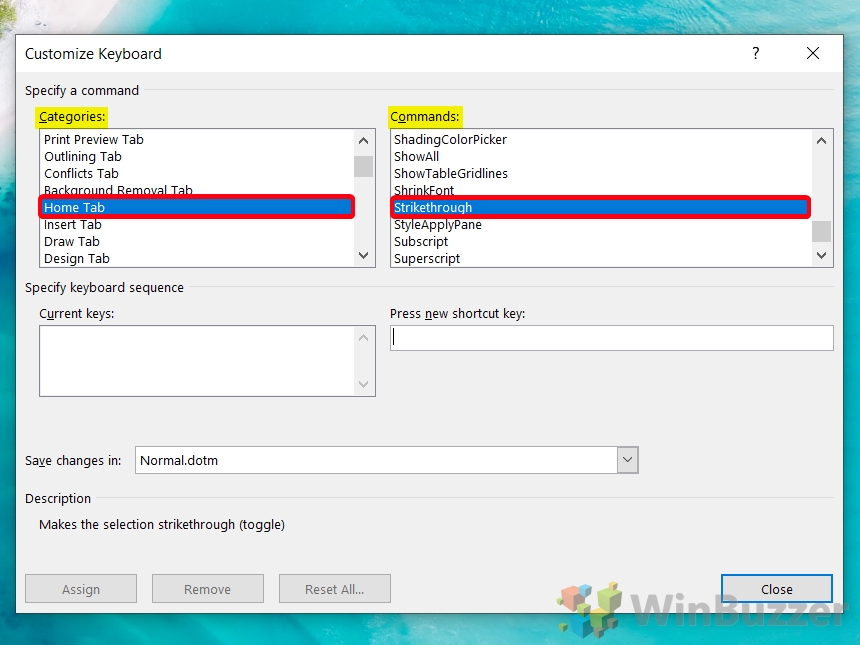
- Click in the "Press new shortcut key" box and press the shorcut you'd like on your keyboard.
In our case, we went for Alt + Ctrl + S. Note that you probably shouldn't use just Ctrl + S as that's reserved for saving your document. Once you've decided, press "Assign".
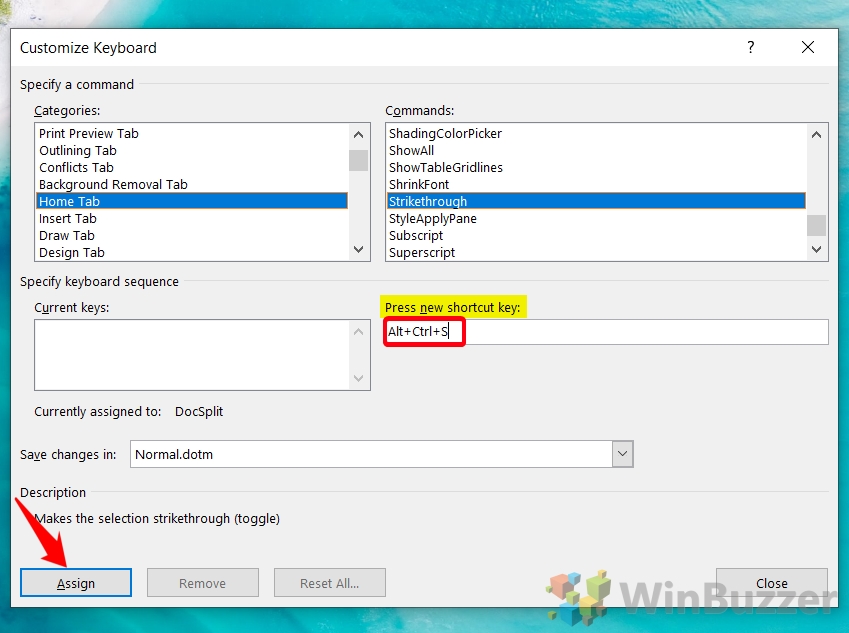
- Select "Normal.dotm" in the "Save changes in:" dropdown
This will ensure the shortcut applies across all documents, rather than just the one you're currently using. You can safely press "Close" when you're done. Make sure you save the normal template when prompted when you exit Word.

- Press "OK" in the Word Options window
You can now test your Word strikethrough shortcut on some text if you'd like.

How to Put a Line Through Any Text Using Unicode
Outside of Word, you can easily put a line through text using online strikethrough text tools that convert text to unicode. You simply paste your text, press a button, and copy and paste it back into your document or message. This however only works with apps and forms that support such unicode strikethrough text characters.
We'll be using SaijoGeorge in this tutorial, but you can use any of the many freely available online tools.
- Enter your text in the white textbox and press "StrikeEm"
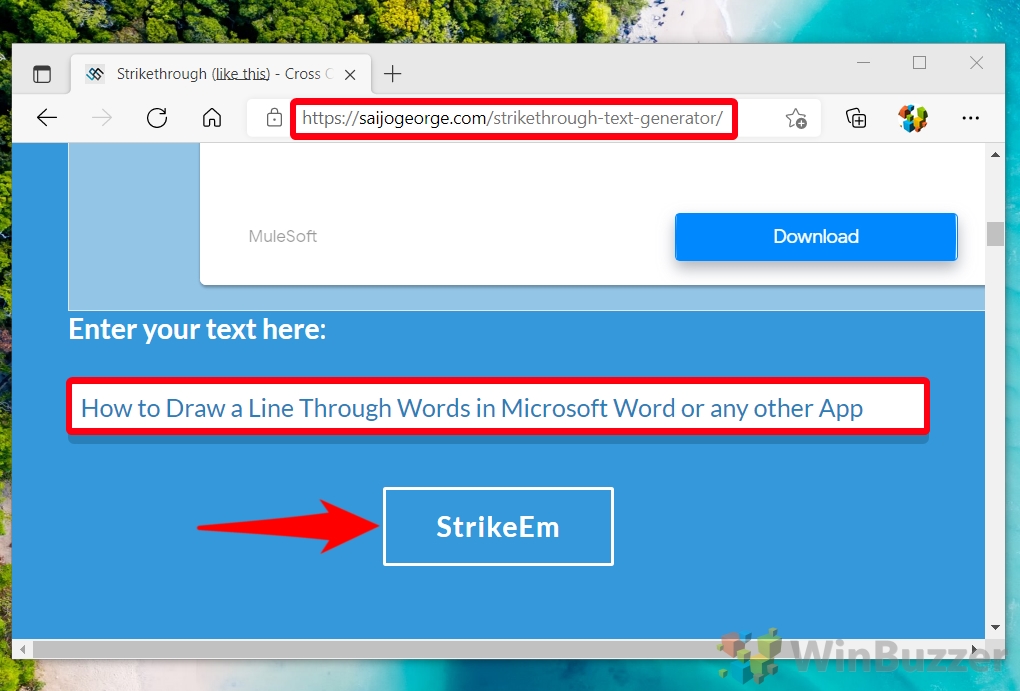
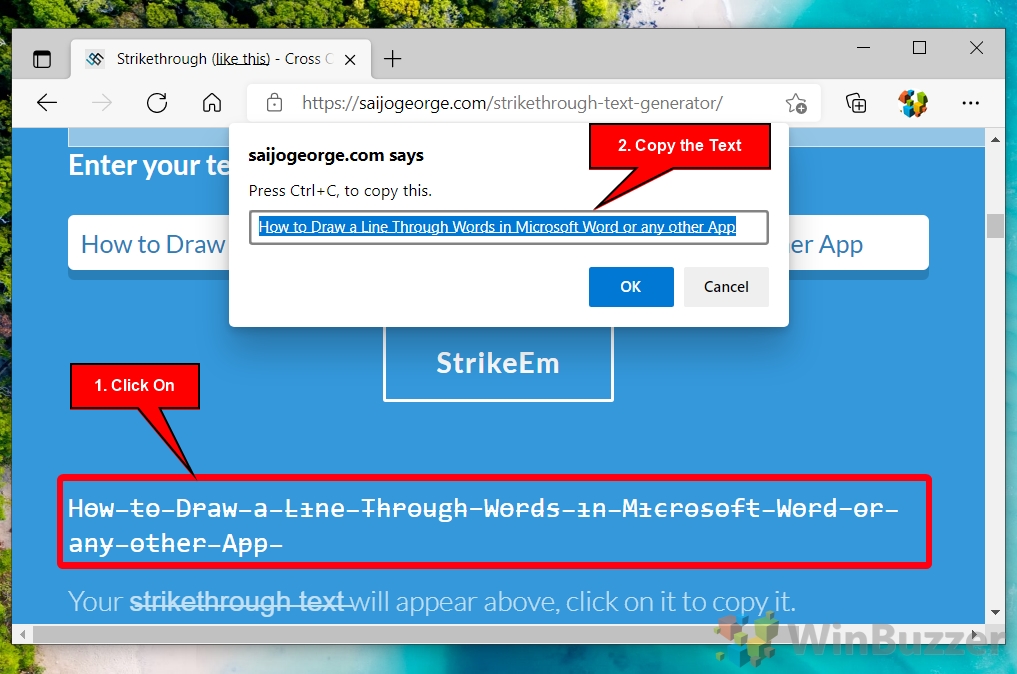
- Click on the strikethrough text and press Ctrl +X to copy the text from the pop-up
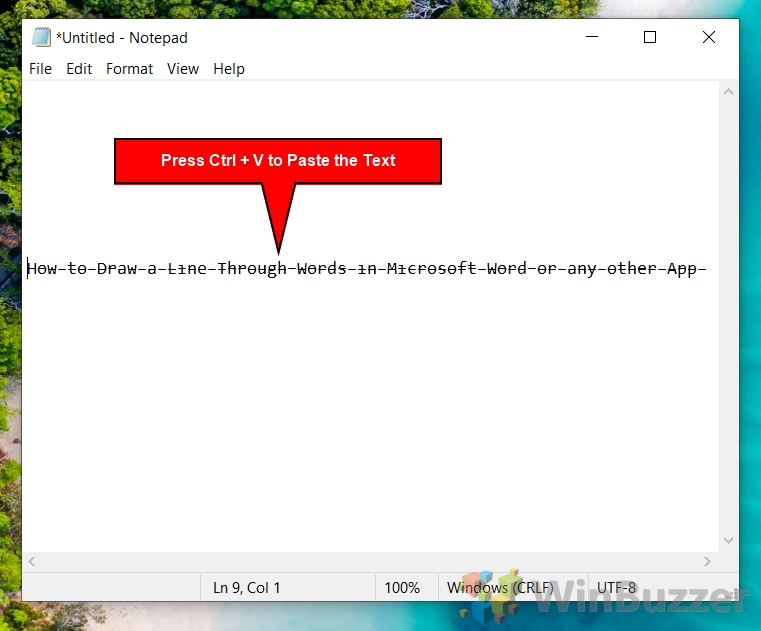
- Example: Press Ctrl + V to paste the crossed-out text in your Word processor
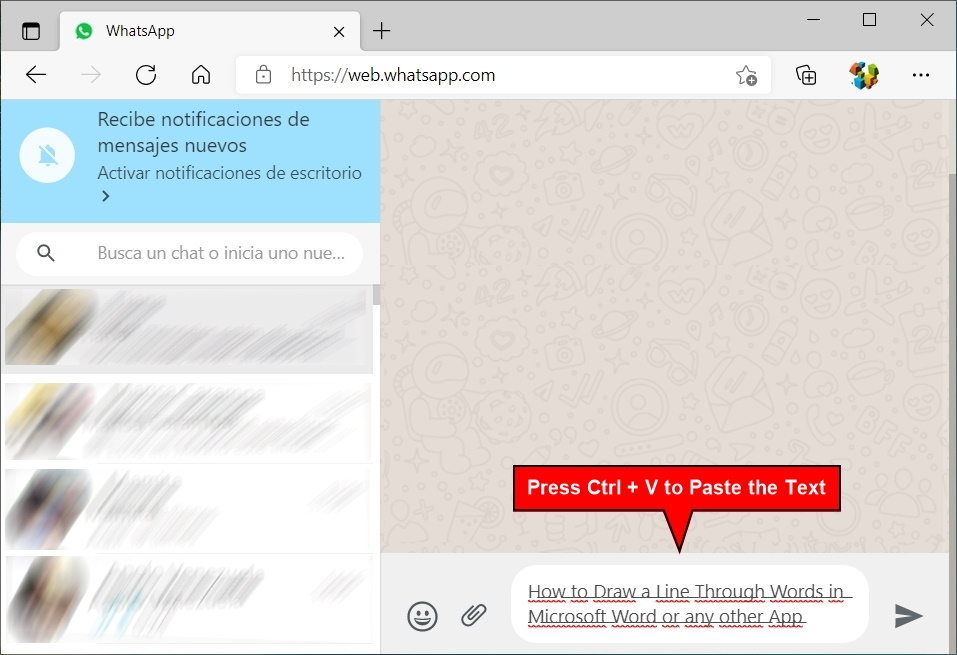
- Example: Press Ctrl + V to paste the text into a chat message
How to Clear Formatting in Word or Turn Text Upside Down
Now that you know how to strikethrough in Word, you may be wondering whether you can remove the effect from a piece of text again. The answer is yes, and our tutorial on how to clear formatting in Word will tell you everything you need to know. If you'd rather play around with other text effects, however, you can read our how to turn text upside down tutorial.
How to Put a Line Through Text in Word
Source: https://winbuzzer.com/2021/10/07/how-to-strikethrough-text-in-word-or-any-other-app-xcxwbt/